
[Raspberry Pi Foundation][def] has made changes to where and how one can download their software. There’s a new home to their software page. With this new homepage, they have a new tool to install the OS. It is called Raspberry Pi Imager. In this short tutorial let us learn how to install the Raspberry Pi OS using Raspberry Pi Imager. This article will also help if you want to install Ubuntu on a supported Raspberry Pi device (see step 3).
Raspberry Pi OS
Raspberry Pi OS (previously called Raspbian) is the officially supported operating system by Raspberry Pi Foundation. It is based on Debian (version 11 at the time of writing this article) and comes with all the necessary software for its functioning.
Currently, the Raspberry Pi OS is available in five variants. You can download it from the Foundation’s new download page. The five variants are:
- Raspberry Pi OS (32-bit) with desktop and recommended software
- Raspberry Pi OS (32-bit) with desktop
- Raspberry Pi OS (32-bit) Lite
- Raspberry Pi OS (64-bit) with desktop
- Raspberry Pi OS (64-bit) Lite
The legacy version of the software is also available on the page.
Raspberry Pi Imager
Using Raspberry Pi Imager is a quick and easy way to install Raspberry Pi OS and other operating systems to a microSD card, ready to use with your Raspberry Pi.
Installing Raspberry Pi OS
-
Download the Raspberry Pi Imager for your current OS and install it. Here is the Raspberry Pi Imager download page. Currently, the OS’ supported are Windows, MacOS, Ubuntu for x86 architecture and Raspberry Pi OS itself.
-
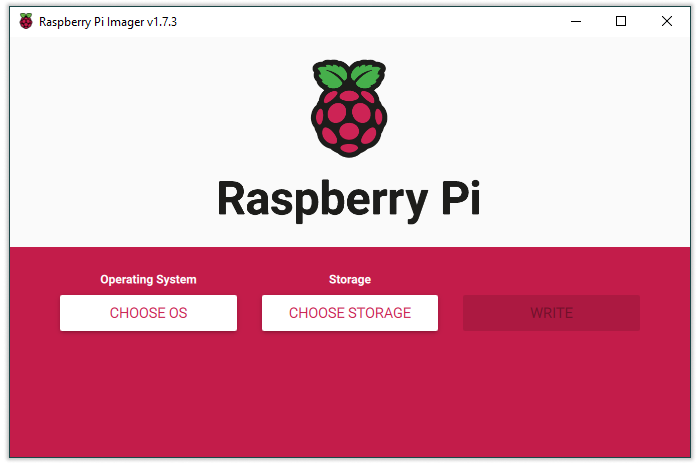
After running the program, you will get the start screen as the image showed above.
-
Click on the ‘CHOOSE OS’ button to select from the list of available Operating systems. The first option is the ‘Raspberry Pi OS (32-bit)’ desktop version, which is also the recommended OS for most Raspberry Pi devices. If you are not sure which Raspberry Pi OS version is best for your device, you can visit the Operating system images page to read more about the compatibility of devices and OS. We have chosen the Raspberry Pi OS Lite (64-bit) for this example.
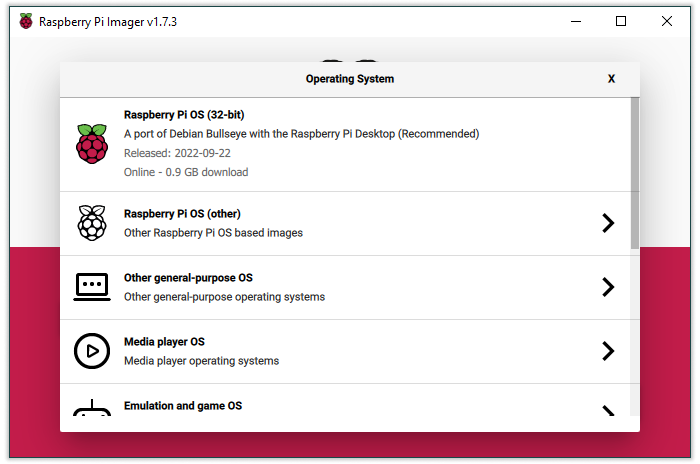
'CHOOSE OS' screen of Raspberry Pi Imager v1.73 To install any other Raspberry Pi OS version, click on the ‘Raspberry Pi OS (other)’ button and then select OS of your choice.
If you want to install a version of Ubuntu, click ‘Other general-purpose OS > Ubuntu > Ubuntu version of your choice’.
-
Next, click on the ‘CHOOSE STORAGE’ to select the card you want to flash with the image. Make sure you select the correct card. Flashing the image will erase all the data on the chosen card.
Note: This step is to be performed with caution.
-
Depending on the OS and version of it, you may or may not see the gear icon at the bottom right corner of the program. This is for setting the Advanced options like hostname, enabling SSH, and setting up username-&-password.
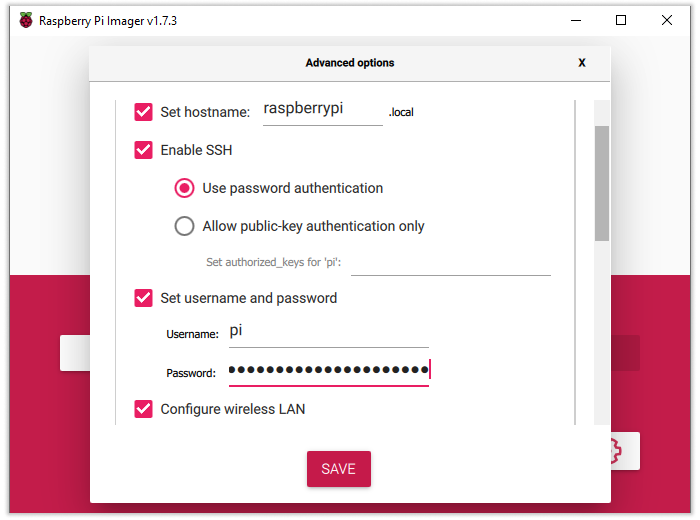
Advanced options settings Recommendation: Try to keep the settings same as shown in the image above. Just change your username, password, SSID for Wireless LAN and its password. We will use these to login in to device in headless mode (using SSH).
-
Review your selections and click on ‘Flash!’. After a while, the OS image would be flashed onto the card.
We have some steps that we recommend for the first boot. Please follow the steps below.
Booting Raspberry Pi OS Lite for the first time on Raspberry Pi 4b.
-
Remove the micro-SD from the micro-SD card reader. Insert the card into the Raspberry Pi SD card slot. Plug in the ethernet cable and power cable. Raspberry Pi OS Lite would boot up.
-
Reserve a local IP address for the Raspberry Pi in your Router’s settings. This will make sure that the local IP address remains constant for the device.
Note: Steps for reserving the local IP are beyond the scope of this tutorial. The steps vary for each router manufacturer and model. -
Connect to Raspberry Pi using SSH on a different machine on the same local network.
-
The command we need to use will be something as follow:
$ ssh useraname@localIPaddress -
The username we had set for the Raspberry Pi is
'pi'. And for this example, the local IP assigned to Rpi 4 is192.168.0.5. So, our command to SSH into Rpi 4 would be:
$ ssh pi@192.168.0.5 -
We will be shown the following message:
pi@192.168.0.5's password: -
Type in the password and press enter.
-
After we log in, we may change the default password to something secure. Enter the following command:
$ passwdYou will be asked to enter your current password and then your new password two times (to double-check that you entered what you wanted).
-
Remember the password you typed in. And, keep it in a safe place. We will need this a lot in future.
-
Let us set the country now. Use the following command:
$ sudo raspi-configYou will be taken to a CLI-based configuration tool. Select
'4 Localisation Options'and then set your ‘Time Zone’ and ‘WLAN country’ accordingly. -
Let’s update the package list from repositories and upgrade the packages first. This is important from a security point of view. Having the packages up-to-date is a must, there is no exception to that. Use the following commands to update and upgrade:
`$ sudo apt-get update && sudo apt-get upgrade`
- Reboot your Raspberry Pi. Use the following command:
`$ sudo shutdown -r now`

After the reboot we will login again using SSH.
That is it, our Raspberry Pi with Raspberry Pi OS Lite is now ready. We may install any packages we wish.